
The Power of a Tie
Type of Ties
To begin, let’s run through the Must-Know and Classic Tie-tying styles. Read on to find the tie style that could be your perfect fit!

3 Must-Knows (Four-in-Hand, Half Windsor & Windsor Knot)
#1 Four-In-Hand Knot

- Complexity: Simple
- Best Collars: Point, spread, club, tab, pinned
- Suitable For: Thicker ties and those with taller build and Square, Round or Oval faces.

Image Adapted From Otaa
Steps
- Loop the tie around your collar. Leave the thick end on your left, a little lower than the thin end.
- Cross the thick end in front of the thin end.
- Wrap the thick end around behind the thin end.
- Cross the thick end in front of the knot.
- Fold the thick end upward.
- Hold open the knot & Feed the thick end through the loop.
- Pull the thick end all the way through the loop. Tighten the knot by holding it gently in one hand and tugging on the thin end with the other.
#2 Half Windsor Knot

- Complexity: Somewhat complex
- Best Collars: Spread
- Suitable For: Medium to thick ties, those of a taller build with a standard length tie, and those with Oblong, Diamond, Heart, Triangle or Oval faces.

Image Adapted From Otaa
Steps
- Loop the tie around your collar. Leave the thick end on your left, a little lower than the thin end.
- Cross the thick end in front of the thin end.
- Wrap the thick end around behind the thin end.
- Cross the thick end diagonally over the thin end.
- Pull the thick end behind the knot.
- Bring the thick end across the front of the knot from right to left.
- Turn the tip of the thick end upward.
- Hold open the knot & Feed the thick end through the loop.
- Pull the thick end all the way through the loop. Tighten the knot by holding it gently in one hand and tugging on the thin end with the other.
#3 Windsor Knot

- Complexity: Complex
- Best Collars: Spread & Cutaway
- Suitable For: Thinner ties, those of taller built with larger neck sizes and those with Oblong, Diamond, Heart, Triangle or Oval faces.

Image Adapted From Otaa
Steps
- Loop the tie around your collar. Leave the thick end on your left, a little lower than the thin end.
- Cross the thick end in front of the thin end.
- Tuck the thick end up beneath the loop.
- Pull the thick end down over the loop.
- Bring the thick end behind the knot from right to left.
- Lift the thick end up over the loop.
- Tuck in the thick end beneath the loop.
- Bring the thick end over the knot from right to left.
- Lift the thick end up beneath the loop.
- Hold open the knot & Feed the thick end through the loop.
- Pull the thick end all the way through the loop. Tighten the knot by holding it gently in one hand and tugging on the thin end with the other.
3 Classics (Simple/Oriental Knot, Kelvin Knot, Pratt/Shelby Knot)
#4 Simple (Oriental) Knot

- Complexity: Simple
- Best Collars: Point, spread, club, tab, pinned
- Suitable For: Thicker ties, and those of taller built, long torsos, of small-frame (whose faces are easily overwhelmed by larger tie knots) or with oval faces.

Image Adapted From Otaa
Steps:
- Loop the tie around your collar with the tie laying reverse-side out. Leave the thick end on your left, a little lower than the thin end.
- Cross the thick end beneath the thin end.
- Pass the thick end across the front of the knot from left to right.
- Tuck the thick end up beneath the loop.
- Hold open the knot & Feed the thick end through the loop.
- Pull the thick end all the way through the loop. Tighten the knot by holding it gently in one hand and tugging on the thin end with the other.
#5 Kelvin Knot

- Complexity: Simple
- Best Collars: Point, spread, club, tab, pinned
- Suitable For: Those with a shorter or smaller frame and want to use a smaller tie knot (needs something to take up some length with their ties).

Image Adapted From Otaa
Steps
- Loop the tie around your collar with the tie laying reverse-side out. Leave the thick end on your left, a little lower than the thin end.
- Cross the thick end beneath the thin end.
- Pass the thick end across the front of the knot from left to right.
- Again, cross the thick end beneath the thin end.
- Again, pass the thick end across the front of the knot from left to right.
- Tuck the thick end up beneath the loop.
- Hold open the knot & Feed the thick end through the loop.
- Pull the thick end all the way through the loop. Tighten the knot by holding it gently in one hand and tugging on the thin end with the other.
#6 Pratt (Shelby) Knot

- Complexity: Simple
- Best Collars: Spread
- Suitable For: Short ties and for those with a taller frame
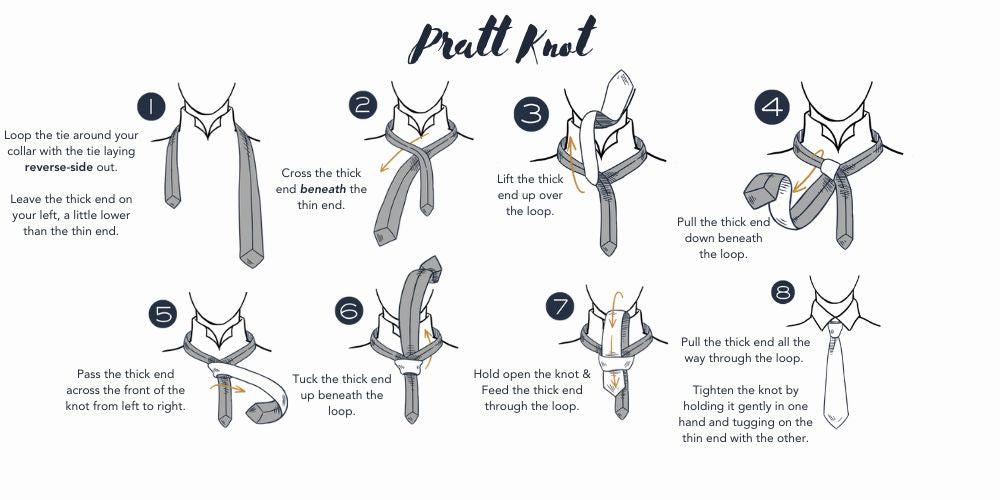
Image Adapted From Otaa
Steps
- Loop the tie around your collar with the tie laying reverse-side out. Leave the thick end on your left, a little lower than the thin end.
- Cross the thick end beneath the thin end.
- Lift the thick end up over the loop.
- Pull the thick end down beneath the loop.
- Pass the thick end across the front of the knot from left to right.
- Tuck the thick end up beneath the loop.
- Hold open the knot & Feed the thick end through the loop.
- Pull the thick end all the way through the loop. Tighten the knot by holding it gently in one hand and tugging on the thin end with the other.
Choosing the Right Knot

By tie thickness
When selecting an appropriate tie style based on the tie’s thickness or width, there is a simple principle to follow – opposites attract.

Anapolis Linen Tie Sabara Skinny Silk Tie
By body shape
When selecting an appropriate tie style based on one’s body shape, it is typically the opposite principle used for tie thickness. Those of smaller stature and frame should tie smaller knots like Four-in-Hand and Simple (Oriental) Knots, whereas men of taller and larger sizes should opt for tie larger knots such as Windsors.
By face shape
- Square or Round faces can be paired with conical knots such as the Four-in-Hand and Pratt knots. The shape of these knots lengthens these faces, which are characteristically smaller.
- Inversely, men with Oblong, Diamond, Heart, and Triangle shaped faces are more suited to symmetrical knots such as the Windsor and Half Windsor Knots.
- Oval-faced men, on the other hand, are suited to all the tie styles mentioned, and even more styles out there.
Still, these are only the general principles for finding an appropriate tie knot. The best way to find the ‘perfect’ fit is through experimentation or trial and error. Don’t be afraid to try out all the different styles!
Ties at a Glance
Of the many different tie styles out there, this guide has honed in on a select few essential styles that every man/woman must know. Now, it’s time for you to use this newfound knowledge the next time you wear a tie – select one that elevates your outfit and sets yourself apart from everyone else!
